Showing posts with label UnrealScript. Show all posts

Monday, July 1, 2013

Using Delegates in UnrealScript

A delegate in UnrealScript is a type of variable that references a function. With the use of delegate is possible to set the function that should be called during the execution of the game.

Before we create a new delegate we will first use one that is already defined in Unreal Engine 3.

A Dynamic Array has a function to sort its data. This function takes as a parameter another function that will be stored internally in a delegate. The description of this function in the UnrealScript Language Reference is as follows:

"Sort(SortDelegate): uses SortDelegate to sort the contents of the array in-place. SortDelegate should have signature matching the following:

delegate int ExampleSort(ArrayType A, ArrayType B) { return A < B ? -1 : 0; } 
// a negative return value indicates the items should be swapped"


This description tells us to create a function that takes two parameters of the same type that is used in the Dynamic Array. We need to compare the two parameters and return a negative value if the items need to change position.

The function is using the ternary operator "? :" which is a type of "if" command abbreviated. The expression "A < B ? -1 : 0" means that the comparison before the "?" will be evaluated. If the result is true, then the resulting value will be the first, which in this example is "-1". If false, the resulting value will be the second, which is "0". It is important to note that in this example the list will be in descending order. That is, the highest values ​​will be first in the list.

The function that is created does not need to have the word "delegate" in its definition.

Now imagine that we have in our game a Dynamic Array of Pawns as below:
var array <Pawn> pawnList;

We want this list to be sorted by the Pawn's Health attribute. The Pawns with more health must be at the beginning of the list.

Example function to sort the Pawns.
function int SortPawn(Pawn A, Pawn B)
{
    local int result;
          
    if(A.Health < B.Health)
    {
        result = -1;
    } 
    else 
    {
        result = 0;
    }
    
    return result;
}

The same function can be written in another way:
function int SortPawn(Pawn A, Pawn B)
{
    return (A.Health < B.Health) ? -1 : 0;
}

To sort you must call the Sort() function of the Dynamic Array:
pawnList.Sort( SortPawn );

Now let's learn how to create a new delegate. To define a delegate in a class do so:
delegate delegateName( parameters ... );

To define a function that takes a delegate as a parameter:
function functionName( delegate< delegateName > delegateParameter)
{
}

In the example below it was created a delegate that will be called when a player (UTPawn) is dying. This delegate can be used to notify some other class in the game that need to perform an action when this happens.
class UTPawnDelegate extends UTPawn;

delegate notifyDeath( Pawn player ) ;

function SetDelegate( delegate< notifyDeath > newDelegate)
{
    notifyDeath = newDelegate ;
}

simulated function PlayDying(class<DamageType> DamageType, vector HitLoc)
{
    Super.PlayDying( DamageType, HitLoc );
    
    notifyDeath( self );
}

Wednesday, May 22, 2013

Using Dynamic Arrays in UnrealScript

Dynamic Array is a collection of data items that can be resized during the execution of the game.

A Dynamic Array is a variable type declared as follows:

var array < arrayType > arrayName ;

The array type can be primitives such as int and float or any class such as Actor and Pawn.

A Dynamic Array can also be defined as local variable within a function using the keyword "local".

The current size of a Dynamic Array can be found in their Length attribute. Access to the individual elements of a Dynamic Array can be done with an index in the same way as in a static array. Remember that the index of an array always starts from 0.

A simple example using Dynamic Array:
class EnemyTypes extends Actor;

var array <int> enemyTypeList;


function int getEnemyType(int index)
{
    if(index < 0 || index >= enemyTypeList.Length) 
    {
        return -1;  // Error: Invalid Index
    } 
    else 
    {
        return enemyTypeList[ index ];
    }
}

function setEnemyType(int index, int enemyType)
{
    if(index >= 0 && enemyType >= 0)
    {
        enemyTypeList[ index ] = enemyType;
    }
}

Note that in the above example, in the function setEnemyType(), there is no problem if the index is greater than the current size of the array, because a Dynamic Array will increase its size to store the required index.

There are some functions that are part of a Dynamic Array. Below are the main ones:

  • AddItem( Element ): Adds an Element to the end of the Dynamic Array. The Element must be the same type of the Dynamic Array.
  • RemoveItem( Element ): Removes an Element of the Dynamic Array.
  • InsertItem( int Index, Element): Inserts an Element in the Dynamic Array at the specified index.
  • Find( Element ): Search for the Element within the Dynamic Array and returns the index of the found element, or "-1" if not found.

I did an example that creates a random amount of Shield Belts (class UTGameContent.UTDroppedShieldBelt) in random positions. The Shield Belts instances that were created are added to a Dynamic Array. After creating all Shield Belts, the Dynamic Array is iterated using the ForEach operator to register in the Log the position of each Shield Belt created.

Code and image of this example:
class TestDynamicArrays extends UTGame;

var array <UTDroppedShieldBelt> shieldList;

function StartMatch()
{
    local UTDroppedShieldBelt shieldInstance;    
    local vector shieldLocation;
    local int totalShields;    
    
    super.StartMatch();

    totalShields = 10 + Rand(10);     
    
    do
    {
        //Choose a random position
        shieldLocation.X = -1000 + Rand(2001); //-1000 to 1000;
        shieldLocation.Y = -1000 + Rand(2001); //-1000 to 1000;
        shieldLocation.Z = 50 ;
    
        shieldInstance = spawn(class 'UTGameContent.UTDroppedShieldBelt', , ,shieldLocation);
        
        shieldList.addItem( shieldInstance );        
                
    } until ( shieldList.Length == totalShields ) ;
    
    `Log("TOTAL OF SHIELDS =" @ shieldList.Length);
    
    //write in the log the position of all shields
    foreach shieldList( shieldInstance )
    {
      `Log( "Location =" @ shieldInstance.Location );
    }
}


This log shows what was registered in one of the executions of the example.
[0294.02] ScriptLog: TOTAL OF SHIELDS = 18
[0294.02] ScriptLog: Location = -390.00,183.00,50.00
[0294.02] ScriptLog: Location = -946.00,-300.00,50.00
[0294.02] ScriptLog: Location = -101.00,133.00,50.00
[0294.02] ScriptLog: Location = 225.00,701.00,50.00
[0294.02] ScriptLog: Location = 611.00,-908.00,50.00
[0294.02] ScriptLog: Location = -650.00,-532.00,50.00
[0294.02] ScriptLog: Location = -550.00,449.00,50.00
[0294.02] ScriptLog: Location = -245.00,531.00,50.00
[0294.02] ScriptLog: Location = 307.00,-890.00,50.00
[0294.02] ScriptLog: Location = -14.00,-534.00,50.00
[0294.02] ScriptLog: Location = -191.00,101.00,50.00
[0294.02] ScriptLog: Location = -756.00,832.00,50.00
[0294.02] ScriptLog: Location = 796.00,390.00,50.00
[0294.02] ScriptLog: Location = -833.00,-915.00,50.00
[0294.02] ScriptLog: Location = 780.00,-248.00,50.00
[0294.02] ScriptLog: Location = 492.00,841.00,50.00
[0294.02] ScriptLog: Location = 461.00,-526.00,50.00
[0294.02] ScriptLog: Location = 179.00,-266.00,50.00

Monday, April 15, 2013

Iterating with ForEach in UnrealScript

Before talk about iteration let's imagine an example. Say you built a game that in the levels there are several UTWeaponPickupFactory actors, but only one of them will have a special behavior that will be programmed in UnrealScript.

The UTWeaponPickupFactory class is found in this class hierarchy:


For this example I will place in the level several UTWeaponPickupFactory actors as shown in the image below.


I selected one of the UTWeaponPickupFactory actors, opened the Properties Window (F4 key) and set the "Tag" property with the value SPECIAL_FACTORY. This Tag property is in the Object category as seen in this image.


When starting the game we need to iterate through all the UTWeaponPickupFactory actors until find the one that has the value SPECIAL_FACTORY in the "Tag" property. When find it we will store the object reference of the current UTWeaponPickupFactory actor to be able to handle it in UnrealScript.

That's what this code does.
class TestIteration extends UTGame;

var UTWeaponPickupFactory SpecialFactory;

function StartMatch()
{
    local UTWeaponPickupFactory factory;
   
    Super.StartMatch();
   
    foreach DynamicActors( class'UTWeaponPickupFactory', factory )
    {
       
      if( factory.tag == 'SPECIAL_FACTORY' ) 
      {
        SpecialFactory = factory;
        break;     // Ends the search
      }
    }
    
    Broadcast( self, " Object Name =" @ SpecialFactory.name) ;    
}

To test this code in UDK set the Game Type to "TestIteration". (UDK Menu: View -> WorldProperties -> Game Type) 

The "foreach" command works with one type of function known as Iterator. These functions have two parameters, the first parameter specifies the type of actor that it should search and the second is a variable that will receive the reference of the current actor in each iteration.

DynamicActors() is the most used iterator function. It searches in the Actors that are not StaticMeshActor. There are several other iterator functions. The main iterators are declared together in the Actor class, just search for "iterator" in the file Actor.uc.

There are other important iterators declared in the WorldInfo class (Actor->Info->ZoneInfo->WorldInfo). To use them you need to put a variable of the type "WorldInfo" in front of the iterator function name. All Actors have a "WorldInfo" variable. Code Sample:
//Extract from GameInfo.uc (Actor->Info->GameInfo)

function StartBots()
{
    local Controller P;

    foreach WorldInfo.AllControllers(class'Controller', P)
    {
        if (P.bIsPlayer && !P.IsA('PlayerController'))
        {
            if (WorldInfo.NetMode == NM_Standalone)
            {
                RestartPlayer(P);
            }
            else
            {
                P.GotoState('Dead','MPStart');
            }
        }
    }
}

Friday, April 5, 2013

Object and Actor References in UnrealScript

  
Some beginners confuse an object with the variable that references the object. This lack of understanding can cause some errors when writing new UnrealScript codes.

Analyze the code below and think about the values ​​that will be written on the screen.
class TestObjReference extends UTGame;

var int xValue;
var int yValue;
var vector vectorStruct;
var Pawn pawnObj;
     
event PostBeginPlay()
{
  SetTimer(3);    
}

function Timer()
{        
  xValue = 10;
  yValue = 10;
  vectorStruct.X = 10;

          //Get a reference to the Player Pawn
  pawnObj = GetALocalPlayerController().Pawn;     
  pawnObj.health = 10;    
    
  ChangeValues( xValue, yValue, vectorStruct, pawnObj);
    
  Broadcast(self, "xValue =" @ xValue);
  Broadcast(self, "yValue =" @ yValue);
  Broadcast(self, "vectorStruct.X =" @ vectorStruct.X );
  Broadcast(self, "pawnObj.health =" @ pawnObj.health);    
}

function ChangeValues(int x, out int y, vector xVector, Pawn xPawn )
{
  x = 50;
  y = 50;
  xVector.X = 50;
  xPawn.health = 50;    
}

If you want to test this code in UDK just set the Game Type to "TestObjReference". (UDK Menu: View -> WorldProperties -> Game Type)

The primitive variables like "int" and "float" and the structs such as "Vector" and "Rotator" contains the values ​​that are assigned to them. But Objects and Actors variables are just references, so they do not contain the values ​​of objects. The image below represents the use of variables of this code in memory.


When you declare a variable of some class it starts with the value "None". This means that it does not reference any object. You can get a reference to an object or create one using the "New" operator. If the variable references an Actor (or a subclass) you must use the "Spawn" function to create a new object.

In the image above we can see that although the variables "pawnObj" and "xPawn" are different they refer to the same object Player Pawn, whereas the variables "vectorStruct" and "xVector" do not have any kind of relationship.

The variables "xValue" and "x" are independent whereas the variables "yValue" and "y" are related because the variable "y" was declared as "out" in the function ChangeValues().

The image below shows the values ​​that will be written on the screen.


When you declare a variable of a specific class, this variable can also refer the subclasses. However, to access the variables and functions that belong to the subclasses is necessary to "cast" this variable into the desired subclass.

The code below shows a simple example of an Actor variable that references an object of the Pawn class. The cast is necessary to access the "Health" variable that belongs to the Pawn class.
function Timer()
{
  local Actor actorObj;

  actorObj = GetALocalPlayerController().Pawn;     

  Pawn(actorObj).health = 10;    
}

Thursday, June 28, 2012

Conclusion of "UnrealScript for Beginners"


In 1999, I had my first contact with the Unreal Engine through the Unreal Tournament game. I was very impressed with the graphics, music, artificial intelligence, weapons and game dynamics. When I remember this game, automatically the Intro music and the voice of the narrator at the beginning of the game start to echo in my mind.

Nowadays, I admire the Unreal Engine by a programmer's perspective. It is fascinating the technology and complexity existent in the core of the Unreal Engine that was developed by the brilliant mind of Tim Sweeney.

I would like to thank Epic Games for creating this amazing engine and made it available through the UDK that allowed many people's dreams to become possible.

"The time has come to prove you are the best.
To crush your enemies;
 
to win the Tournament."

(Unreal Tournament 1 Intro)

Wednesday, June 27, 2012

Platformer Kit: SPG_AIPawn class (UnrealScript)

The SPG_AIPawn class represents the bots that attack the player in the Platform Kit. The variables defined for this class are:
class SPG_AIPawn extends Pawn
      placeable;

// Dynamic light environment component to help speed up lighting calculations for the pawn
var(Pawn) const DynamicLightEnvironmentComponent LightEnvironment;

// Ground speed of the pawn, display as Ground Speed in the editor
var(Pawn) const float UserGroundSpeed<DisplayName=Ground Speed>;

// Explosion particle system to play when blowing up
var(Pawn) const ParticleSystem ExplosionParticleTemplate;

// Explosion sound to play
var(Pawn) const SoundCue ExplosionSoundCue;

// Explosion damage amount 
var(Pawn) const int ExplosionDamage;

// Archetyped pick up to drop
var(Pawn) const archetype DroppedPickup ArchetypedPickup;

// Percentage chance to drop pickups
var(Pawn) const float ChanceToDropPickup;

// Current enemy
var Actor Enemy;

There is an Archetype for the SPG_AIPawn class. The image below shows the specific variables of the SPG_AIPawn class.


The Tick() function is executed every frame. In this function a reference to the player is stored in the Enemy variable, if this has not been done.

After that, if the bot is already walking on the ground (Physics == PHYS_Walking), it gets the player's location and adjust its velocity and rotation to move toward the player.
simulated function Tick(float DeltaTime)
{
    local PlayerController PlayerController;
    local Vector Direction;
    local Rotator NewRotation;

    Super.Tick(DeltaTime);

    // If we don't have an enemy yet...
    if (Enemy == None)
    {
        // Find the player controller in the world
        PlayerController = GetALocalPlayerController();

        if (PlayerController != None && PlayerController.Pawn != None)
        {
            // Set the enemy to the player controller's pawn
            Enemy = PlayerController.Pawn;
        }
    }
    else if (Physics == PHYS_Walking)
    {
        // Find the direction in order for me to look at my enemy
        Direction = Enemy.Location - Location;

        // Only need to use the yaw from the direction
        NewRotation = Rotator(Direction);
        NewRotation.Pitch = 0;
        NewRotation.Roll = 0;

        // Set the rotation so that I look at the enemy
        SetRotation(NewRotation);

        // Set my velocity, so I move towards the enemy
        Velocity = Normal(Enemy.Location - Location) * UserGroundSpeed;

        // Set my acceleration, so I move towards the enemy
        Acceleration = Velocity;
    }
}


When a bot collides with the player, the Bump() function is executed. For more information about collision read the article: "Collision in UnrealScript".

The player, who is represented by the variable Other in this function, receives damage whose value is set in the ExplosionDamage variable. In the image of the Archetype we can see that the default value of this variable is 5.

The particles effect that represents the explosion is triggered and is played the sound of the explosion stored in the variable ExplosionSoundCue. For more information about SoundCue, read the article: "Playing Sounds in UnrealScript".
event Bump(Actor Other, PrimitiveComponent OtherComp, Vector HitNormal)
{
    Super.Bump(Other, OtherComp, HitNormal);

    if (SPG_PlayerPawn(Other) != None)
    {
        // Apply damage to the bumped pawn
        Other.TakeDamage(ExplosionDamage, None, Location, Vect(0, 0, 0), class'DamageType');

        // Play the particle effect
        if (ExplosionParticleTemplate != None)
        {
            WorldInfo.MyEmitterPool.SpawnEmitter(ExplosionParticleTemplate, Location);
        }

        // Play the explosion sound
        if (ExplosionSoundCue != None)
        {
            PlaySound(ExplosionSoundCue);
        }

        // Destroy the pawn
        Destroy();
    }
}


When a bot is eliminated by the player, the PlayDying() function is executed. In this function the physics of the bot is defined as PHYS_RigidBody so that it falls to the ground.

Is checked the possibility of the bot drop a health item, which is represented by the class SPG_HealthPickup. This test is done with the expression: "FRand() <= ChanceToDropPickup". FRand() is an UnrealScript function that returns a random value between 0.0 and 1.0. The variable ChanceToDropPickup is defined in the Archetype with the value "0.3". This means that there is a chance of 30% that a health item falls from the bot.
simulated function PlayDying(class<DamageType> DamageType, vector HitLoc)
{
    local DroppedPickup DroppedPickup;

    Mesh.MinDistFactorForKinematicUpdate = 0.0;
    Mesh.ForceSkelUpdate();
    Mesh.SetTickGroup(TG_PostAsyncWork);
    CollisionComponent = Mesh;
    CylinderComponent.SetActorCollision(false, false);
    Mesh.SetActorCollision(true, false);
    Mesh.SetTraceBlocking(true, true);
    SetPawnRBChannels(true);

    SetPhysics(PHYS_RigidBody);

    Mesh.PhysicsWeight = 1.f;

    if (Mesh.bNotUpdatingKinematicDueToDistance)
    {
        Mesh.UpdateRBBonesFromSpaceBases(true, true);
    }

    Mesh.PhysicsAssetInstance.SetAllBodiesFixed(false);
    Mesh.bUpdateKinematicBonesFromAnimation = false;
    Mesh.WakeRigidBody();

    // Set the actor to automatically destroy in ten seconds.
    LifeSpan = 10.f;

    // Chance to drop a pick up
    if (ArchetypedPickup != None && FRand() <= ChanceToDropPickup)
    {
        // Spawn a dropped pickup
        DroppedPickup = Spawn(ArchetypedPickup.Class,,, Location,, ArchetypedPickup);

        if (DroppedPickup != None)
        {
            // Set the dropped pick up to falling
            DroppedPickup.SetPhysics(PHYS_Falling);

            // Set the velocity of the dropped pickup to the toss velocity
            DroppedPickup.Velocity.X = 0;
            DroppedPickup.Velocity.Y = 0;
            DroppedPickup.Velocity.Z = RandRange(200.f, 250.f);
        }
    }
}


Tuesday, June 26, 2012

Platformer Kit: SPG_Weapon class (UnrealScript)

The SPG_Weapon class represents the weapon used in the Platformer Kit. It is based on the Link Gun weapon of Unreal Tournament, but only has the option of shooting with projectile.

If you do not know about the Weapon class first read the article: "Weapon Class (UnrealScript)".

The variables of the SPG_Weapon class are available for changing in the editor.
class SPG_Weapon extends Weapon;

// Name of the socket which represents the muzzle socket
var(Weapon) const Name MuzzleSocketName;

// Particle system representing the muzzle flash
var(Weapon) const ParticleSystemComponent MuzzleFlash;

// Projectile classes that this weapon fires. DisplayName lets the editor show this as WeaponProjectiles
var(Weapon) const array< class<Projectile> > Projectiles<DisplayName=Weapon Projectiles>;

// Sounds to play back when the weapon is fired
var(Weapon) const array<SoundCue> WeaponFireSounds;

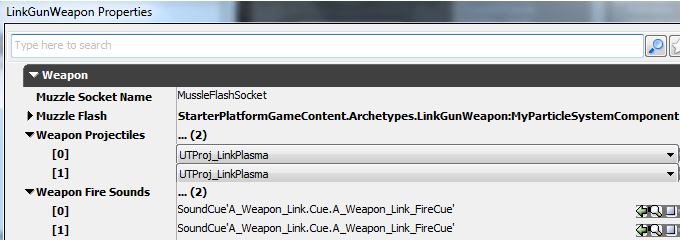
An Archetype was also created for SPG_Weapon class. The image below shows the values ​​of some variables.


The SPG_Weapon class uses two Sockets. One to define the position in the 3D model of the weapon where the projectile is fired. The other Socket belongs to the SPG_PlayerPawn class and defines the position where the weapon must stay relative to the player. To understand more about Sockets, read the article at UDN: "Skeletal Mesh Sockets".

In the PostBeginPlay() function, the Particle System Component represented by the "MuzzleFlash" variable is attached to the Socket of the weapon. The weapon is attached to the player in the ClientGivenTo() function.
simulated event PostBeginPlay()
{
    local SkeletalMeshComponent SkeletalMeshComponent;

    Super.PostBeginPlay();

    if (MuzzleFlash != None)
    {
        SkeletalMeshComponent = SkeletalMeshComponent(Mesh);
        if (SkeletalMeshComponent != None && SkeletalMeshComponent.GetSocketByName(MuzzleSocketName) != None)
        {
            SkeletalMeshComponent.AttachComponentToSocket(MuzzleFlash, MuzzleSocketName);
        }
    }
}

One function that is executed when the weapon is fired is the PlayFireEffects(). It is responsible for activating the Particles System and play the weapon firing sound.

For more information about Particles Systems, read the article at UDN: "Particles Systems".

Below is the image when the weapon is fired and the code of the PlayFireEffects() function.

simulated function PlayFireEffects(byte FireModeNum, optional vector HitLocation)
{
    if (MuzzleFlash != None)
    {
        // Activate the muzzle flash
        MuzzleFlash.ActivateSystem();
    }

    // Play back weapon fire sound if FireModeNum is within the array bounds and if the 
    // weapon fire sound in that array index is not none
    if (FireModeNum < WeaponFireSounds.Length && WeaponFireSounds[FireModeNum] != None && Instigator != None)
    {
        Instigator.PlaySound(WeaponFireSounds[FireModeNum]);
    }
}

The other function that is executed when the weapon is fired is the ProjectileFire(). It is responsible for creating a new projectile and start it in the correct position and direction.

The position of the projectile is obtained from the GetWeaponStartTraceLocation() function of the SPG_PlayerPawn class, which is represented in the code by the variable Instigator.
simulated function Projectile ProjectileFire()
{
    local Vector SpawnLocation;
    local Rotator SpawnRotation;
    local class<Projectile> ProjectileClass;
    local Projectile SpawnedProjectile;

    // tell remote clients that we fired, to trigger effects
    IncrementFlashCount();

    // Only allow servers to spawn projectiles
    if (Role == ROLE_Authority)
    {
        // This is where we would spawn the projectile
        SpawnLocation = Instigator.GetWeaponStartTraceLocation();

        // This is the rotation we should spawn the projectile
        SpawnRotation = GetAdjustedAim(SpawnLocation);

        // Get the projectile class
        ProjectileClass = GetProjectileClass();
        if (ProjectileClass != None)
        {
            // Spawn the projectile setting the projectile's owner to myself
            SpawnedProjectile = Spawn(ProjectileClass, Self,, SpawnLocation, SpawnRotation);

            // Check if we've spawned the projectile, and that it isn't going to be deleted
            if (SpawnedProjectile != None && !SpawnedProjectile.bDeleteMe)
            {
                // Initialize the projectile
                SpawnedProjectile.Init(Vector(SpawnRotation));
            }
        }
      
        // Return it up the line
        return SpawnedProjectile;
    }

    return None;
}

Monday, June 25, 2012

Platformer Kit: SPG_PlayerPawn class (UnrealScript)

The SPG_PlayerPawn class represents the player's character. If you do not know about the Pawn class first read the article: "Pawn Class (UnrealScript)".

The variables below of the SPG_PlayerPawn class are available for changing in the editor.
class SPG_PlayerPawn extends Pawn;

// Dynamic light environment component to help speed up lighting calculations for the pawn
var(Pawn) const DynamicLightEnvironmentComponent LightEnvironment;

// How fast a pawn turns
var(Pawn) const float TurnRate;

// How high the pawn jumps
var(Pawn) const float JumpHeight;

// Socket to use for attaching weapons
var(Pawn) const Name WeaponSocketName;

// Height to set the collision cylinder when crouching
var(Pawn) const float CrouchHeightOverride<DisplayName=Crouch Height>;

// Radius to set the collision cylinder when crouching
var(Pawn) const float CrouchRadiusOverride<DisplayName=Crouch Radius>;

An Archetype was also created for SPG_PlayerPawn class. The image below shows the values ​​of some variables.


The FaceRotation() function of the SPG_PlayerPawn class is called from the UpdateRotation() function of the SPG_PlayerController class.

This function will adjust two types of rotation: the rotation of the aim and the rotation of the character.

The rotation of the aim is adjusted from the variable "AimNode.Aim.Y" based on the value of the Pitch variable of the Rotator that is passed as a parameter. The variable AimNode is of the AnimNodeAimOffset type.

The rotation of the character is done ​​based on the value of the Yaw variable of the Rotator that is passed as a parameter, using the SetRotation() function of the Pawn class.
simulated function FaceRotation(Rotator NewRotation, float DeltaTime)
{
    local Rotator FacingRotation;

    // Set the desired yaw the new rotation yaw
    if (NewRotation.Yaw != 0)
    {
        DesiredYaw = NewRotation.Yaw;
    }

    // If the current yaw doesn't match the desired yaw, then interpolate towards it
    if (CurrentYaw != DesiredYaw)
    {
        CurrentYaw = Lerp(CurrentYaw, DesiredYaw, TurnRate * DeltaTime);
    }

    // If we have a valid aim offset node
    if (AimNode != None)
    {
        // Clamp the current pitch to the view pitch min and view pitch max
        CurrentPitch = Clamp(CurrentPitch + NewRotation.Pitch, ViewPitchMin, ViewPitchMax);

        if (CurrentPitch > 0.f)
        {
            // Handle when we're aiming up
            AimNode.Aim.Y = float(CurrentPitch) / ViewPitchMax;
        }
        else if (CurrentPitch < 0.f)
        {
            // Handle when we're aiming down
            AimNode.Aim.Y = float(CurrentPitch) / ViewPitchMin;
           
            if (AimNode.Aim.Y > 0.f)
            {
                AimNode.Aim.Y *= -1.f;
            }
        }
        else
        {
            // Handle when we're aiming straight forward
            AimNode.Aim.Y = 0.f;
        }
    }

    // Update the facing rotation
    FacingRotation.Pitch = 0;
    FacingRotation.Yaw = CurrentYaw;
    FacingRotation.Roll = 0;

    SetRotation(FacingRotation);
}

The DoJump() function is called to perform the jump of the character. It takes into account the different types of Physics that the character can be.

In essence, the velocity along the Z axis (up) receives the value of the JumpHeight variable that was defined for this class and can be adjusted in the Archetype. After it is checked whether the player is on a moving platform. If true, then the velocitity of the platform (Base.Velocity.Z) influences the velocity of the jump of the player.
function bool DoJump(bool bUpdating)
{
    if (bJumpCapable && !bIsCrouched && !bWantsToCrouch && (Physics == PHYS_Walking || Physics == PHYS_Ladder || Physics == PHYS_Spider))
     {
        if (Physics == PHYS_Spider)
        {
            Velocity = JumpHeight * Floor;
        }
        else if (Physics == PHYS_Ladder)
        {
            Velocity.Z = 0.f;
        }
        else
        {
            Velocity.Z = JumpHeight;
        }

        if (Base != None && !Base.bWorldGeometry && Base.Velocity.Z > 0.f)
        {
            Velocity.Z += Base.Velocity.Z;
        }

        SetPhysics(PHYS_Falling);
        return true;
    }

    return false;
}


Friday, June 22, 2012

Platformer Kit: SPG_PlayerController class (UnrealScript)

The SPG_PlayerController class is responsible for adapting the commands of the player to the platform style.

If you do not know about the Controller class, first read the article: "Controller Class (UnrealScript)".

One of the functions that is overridden is the UpdateRotation() whose code is below.
function UpdateRotation(float DeltaTime)
{
    local Rotator DeltaRot;

    // Set the delta rotation to that of the desired rotation, as the desired rotation represents
    // the rotation derived from the acceleration of the pawn
    DeltaRot = DesiredRotation;

    // Set the delta pitch to read from the look up input
    DeltaRot.Pitch = PlayerInput.aLookUp;

    // Never need to roll the delta rotation
    DeltaRot.Roll = 0;

    // Shake the camera if necessary
    ViewShake(DeltaTime);

    // If we have a pawn, update its facing rotation
    if (Pawn != None)
    {
        Pawn.FaceRotation(DeltaRot, DeltaTime);
    }
}

There are two types of rotations that occur in the Platformer Kit. One is the rotation that occurs when the player changes the direction he is moving. The other is the rotation of the aim that changes the direction of the fire.

The rotation of the player is manipulated through the use of the variable DesiredRotation. The rotation of the aim is obtained from the variable aLookUp of the PlayerInput class. The variable aLookUp maps the forward and backward movement of the Mouse. The image below shows the player looking upwards.

The FaceRotation() function which will be called from the Pawn object, is that defined in the SPG_PlayerPawn class.


In the PlayerMove() function an acceleration is calculated based on the variable "PlayerInput.aStrafe" which represents the horizontal movement. This acceleration is stored in the variable of type Vector "NewAccel". The function code is below.
state PlayerWalking
{
    function PlayerMove(float DeltaTime)
    {
        local Vector X, Y, Z, NewAccel, CameraLocation;
        local Rotator OldRotation, CameraRotation;
        local bool bSaveJump;

        // If we don't have a pawn to control, then we should go to the dead state
        if (Pawn == None)
        {
            GotoState('Dead');
        }
        else
        {
            // Grab the camera view point as we want to have movement aligned to the camera
            PlayerCamera.GetCameraViewPoint(CameraLocation, CameraRotation);

            // Get the individual axes of the rotation
            GetAxes(CameraRotation, X, Y, Z);

            // Update acceleration
            NewAccel = PlayerInput.aStrafe * Y;
            NewAccel.Z = 0;
            NewAccel = Pawn.AccelRate * Normal(NewAccel);

            // Set the desired rotation
            DesiredRotation = Rotator(NewAccel);

            // Update rotation
            OldRotation = Rotation;
            UpdateRotation(DeltaTime);

            // Update crouch
            Pawn.ShouldCrouch(bool(bDuck));

            // Handle jumping
            if (bPressedJump && Pawn.CannotJumpNow())
            {
                bSaveJump = true;
                bPressedJump = false;
            }
            else
            {
                bSaveJump = false;
            }

            // Update the movement, either replicate it or process it
            if (Role < ROLE_Authority)
            {
                ReplicateMove(DeltaTime, NewAccel, DCLICK_None, OldRotation - Rotation);
            }
            else
            {
                ProcessMove(DeltaTime, NewAccel, DCLICK_None, OldRotation - Rotation);
            }

            bPressedJump = bSaveJump;
        }
    }
}

At the end of the PlayerMove() function there is the following test: "if (Role < ROLE_Authority)". This is used to check if the game is a client that is using a server. If this code is running on a server or in a single player game then the value of the "Role" variable will be equal to "ROLE_Authority."

Thursday, June 21, 2012

Platformer Kit: SPG_GameInfo class (UnrealScript)

The main adjustments of the SPG_GameInfo class were done to enable the use of Archetypes of the player's Pawn and Weapon classes.

This class contains the references of the Archetypes in the DefaultPawnArchetype and DefaultWeaponArchetype variables.
class SPG_GameInfo extends SimpleGame;

// Variable which references the default pawn archetype stored within a package
var() const archetype Pawn DefaultPawnArchetype;
// Variable which references the default weapon archetype stored within a package
var() const archetype Weapon DefaultWeaponArchetype;

If you do not know the GameInfo class, take a look at my article, "GameInfo Class (UnrealScript)".

The SPG_GameInfo class overrides the SpawnDefaultPawnFor() function so that the instance of the player's Pawn class is created based on the Archetype.
function Pawn SpawnDefaultPawnFor(Controller NewPlayer, NavigationPoint StartSpot)
{
    local Rotator StartRotation;
    local Pawn SpawnedPawn;

    // Quick exit if NewPlayer is none or if StartSpot is none
    if (NewPlayer == None || StartSpot == None)
    {
        return None;
    }

    // Only the start spot's yaw from its rotation is required
    StartRotation = Rot(0, 0, 0);
    StartRotation.Yaw = StartSpot.Rotation.Yaw;

    // Spawn the default pawn archetype at the start spot's location and the start rotation defined above
    // Set SpawnedPawn to the spawned
    SpawnedPawn = Spawn(DefaultPawnArchetype.Class,,, StartSpot.Location, StartRotation, DefaultPawnArchetype);

    // Return the value of SpawnedPawn
    return SpawnedPawn;
}

The SpawnDefaultPawnFor() function uses a local variable of type Rotator called StartRotation to get only the rotation on the yaw axis from the StartSpot of the game. For more information about rotation, read my article: "Using Rotators in UnrealScript".

After that, it creates a new instance of Pawn based on the Archetype "DefaultPawnArchetype" using the Spawn() function.

Another function that is overridden in the SPG_GameInfo class is the AddDefaultInventory(). In this function is obtained a reference of the SPG_InventoryManager class in order to create the weapon based on the Archetype DefaultWeaponArchetype.
event AddDefaultInventory(Pawn P)
{
    local SPG_InventoryManager SPG_InventoryManager;

    Super.AddDefaultInventory(P);

    // Ensure that we have a valid default weapon archetype
    if (DefaultWeaponArchetype != None)
    {
        // Get the inventory manager
        SPG_InventoryManager = SPG_InventoryManager(P.InvManager);
        if (SPG_InventoryManager != None)
        {
            // Create the inventory from the archetype
            SPG_InventoryManager.CreateInventoryArchetype(DefaultWeaponArchetype, false);
        }
    }
}

In the defaultproperties block are specified the Archetypes of the Pawn and Weapon, besides the classes responsible for the HUD and the PlayerController.
defaultproperties
{
    // What player controller class to create for the player
    PlayerControllerClass=class'SPG_PlayerController'
    // What default pawn archetype to spawn for the player
    DefaultPawnArchetype=SPG_PlayerPawn'StarterPlatformGameContent.Archetypes.PlayerPawn'
    // What default weapon archetype to spawn for the player
    DefaultWeaponArchetype=SPG_Weapon'StarterPlatformGameContent.Archetypes.LinkGunWeapon'
    // What HUD class to create for the player
    HUDType=class'SPG_HUD'
}

Tuesday, June 19, 2012

Platformer Kit: SPG_InventoryManager class (UnrealScript)

The SPG_InventoryManager class exists to allow the creation of inventory items based on Archetypes. In the Platformer Kit it is used to create the weapon of the player.

The class code is below:
class SPG_InventoryManager extends InventoryManager;

simulated function Inventory CreateInventoryArchetype(Inventory NewInventoryItemArchetype, optional bool bDoNotActivate)
{
    local Inventory    Inv;
  
    // Ensure the inventory archetype is valid
    if (NewInventoryItemArchetype != None)
    {
        // Spawn the inventory archetype
        Inv = Spawn(NewInventoryItemArchetype.Class, Owner,,,, NewInventoryItemArchetype);
      
        // Spawned the inventory, and add the inventory
        if (Inv != None && !AddInventory(Inv, bDoNotActivate))
        {
            // Unable to add the inventory, so destroy the spawned inventory
            Inv.Destroy();
            Inv = None;
        }
    }

    // Return the spawned inventory
    return Inv;
}

defaultproperties
{
    // Create the pending fire array
    PendingFire(0)=0
    PendingFire(1)=0
}

The CreateInventoryArchetype() function is called from the SPG_GameInfo class. It uses the Spawn() function to create an instance of the Inventory class based on the Archetype  received as parameter.

The Spawn() function is defined in the Actor class and has the following parameters:
native noexport final function coerce actor Spawn
(
    class<actor>      SpawnClass,
    optional actor    SpawnOwner,
    optional name     SpawnTag,
    optional vector   SpawnLocation,
    optional rotator  SpawnRotation,
    optional Actor    ActorTemplate,
    optional bool     bNoCollisionFail
);

Once created the instance of Inventory, it is added to the player's inventory through the AddInventory() function. You can find the code of this function in my article "PickupFactory and Inventory in UnrealScript".

If for some reason it is not possible to add the Inventory, the Destroy() function should be called to remove the object from memory. The Destroy() function is not executed immediately, so you need to assign "None" to the variable after the call to the Destroy() function.

Friday, June 15, 2012

Platformer Kit: SPG_HealthPickup class (UnrealScript)


The SPG_HealthPickup class is used to represent a health item that can be dropped from an enemy when he dies. This class is a subclass of DroppedPickup. Its variables are:
class SPG_HealthPickup extends DroppedPickup
      placeable;

// Static mesh used by the pick up
var(HealthPickup) const StaticMeshComponent Mesh;

// Sound to play when the pick up is picked up by a pawn
var(HealthPickup) const SoundCue PickupSound;

// How much health to give to the pawn when picked up
var(HealthPickup) const int HealthToGive;

The Platformer Starter Kit also uses an Archetype of this class to ease changes in the values ​​of its variables.

The image below shows the default values ​​of the Archetype of the SPG_HealthPickup class.


If you know nothing about Pickups, I recommend reading my article "PickupFactory and Inventory in UnrealScript".

The "GiveTo(Pawn P)" function is called when the player gets an item. It just plays a sound and gives more health to the player:
function GiveTo(Pawn P)
{
    // Play sound
    if (PickupSound != None)
    {
        PlaySound(PickupSound);        
    }

    // Add health to the player, but clamp it to the pawn's maximum health
    P.Health = Min(P.Health + HealthToGive, P.HealthMax);

    // Handle the rest of pick up
    PickedUpBy(P);
}

The "int Min(int A, int B)" function returns the smallest number between two integers and is used to prevent the player's health exceeds the maximum value. The "PickedUpBy(Pawn P)" function belongs to the DroppedPickup class and it just calls the "Destroy()" function to remove this Pickup from the game.

The SPG_HealthPickup class overrides the "ValidTouch(Pawn Other)" function, which is within the state "Pickup" of the DroppedPickup class, with a simpler version of the function. This function is called every time there is a collision with an object of type Pawn to check if it is the player who is picking up the item.
auto state Pickup
{
    function bool ValidTouch(Pawn Other)
    {
        // make sure its a live player
        if (Other == None || !Other.bCanPickupInventory || (Other.DrivenVehicle == None && Other.Controller == None))
        {
            return false;
        }

        // make sure thrower doesn't run over own weapon
        if (Physics == PHYS_Falling && Other == Instigator && Velocity.Z > 0)
        {
            return false;
        }

        return true;
    }
}

Finally, we have the defaultproperties block whose code is below. It defined an object of StaticMeshComponent type with the name MyStaticMeshComponent. If you look at the image of the Archetype that was created for this class, the Mesh property  is associated with the MyStaticMeshComponent object that will be used as a component, using ":" and the name of the object.
defaultproperties
{
    // Remove the sprite component
    Components.Remove(Sprite);

    // Add the static mesh component
    Begin Object Class=StaticMeshComponent Name=MyStaticMeshComponent
    End Object
    Mesh=MyStaticMeshComponent
    Components.Add(MyStaticMeshComponent);
}

Friday, June 8, 2012

Platformer Kit: SPG_Camera class (UnrealScript)


The Platformer Starter Kit uses a side view similar to the old 2D platform games. The SPG_Camera and SPG_CameraProperties classes are used to define the camera.

The SPG_CameraProperties class has only a Vector used to define the position of the camera relative to the player. The class code is below:
class SPG_CameraProperties extends Object
      HideCategories(Object);

// How much to offset the camera by
var(CameraProperties) const Vector CameraOffset;

defaultproperties
{
}

An Archetype was created based on this class in the package "StarterPlatformGameContent.Archetypes.CameraProperties" as shown in the image below.


The SPG_Camera class has an instance of the SPG_CameraProperties class that is loaded from the Archetype:
class SPG_Camera extends Camera;

var const archetype SPG_CameraProperties CameraProperties;

/**
 * Updates the camera's view target. Called once per tick
 *
 * @param    OutVT        Outputted camera view target
 * @param    DeltaTime    Time since the last tick was executed
 */
function UpdateViewTarget(out TViewTarget OutVT, float DeltaTime)
{
    // Early exit if:
    // - We have a pending view target
    // - OutVT currently equals ViewTarget
    // - Blending parameter is lock out going
    if (PendingViewTarget.Target != None && OutVT == ViewTarget && BlendParams.bLockOutgoing)
    {
        return;
    }

    // Add the camera offset to the target's location to get the location of the camera
    OutVT.POV.Location = OutVT.Target.Location + CameraProperties.CameraOffset;
    // Make the camera point towards the target's location
    OutVT.POV.Rotation = Rotator(OutVT.Target.Location - OutVT.POV.Location);
}

defaultproperties
{
    CameraProperties=SPG_CameraProperties'StarterPlatformGameContent.Archetypes.CameraProperties'
}

If you do not know anything about the Camera class, I recommend reading my article "Camera Class (UnrealScript)".

The SPG_Camera class modifies the camera in a very simple way, just overriding the UpdateViewTarget() function of the Camera class. This function receives as output parameter an variable of type TViewTarget, which is a structure (struct) defined in Camera class:
//Extract from Camera class...

/**
 * View Target definition
 * A View Target is responsible for providing the Camera with an ideal Point of View (POV)
 */
struct native TViewTarget
{
    /** Target Actor used to compute ideal POV */
    var()    Actor                   Target;

    /** Controller of Target (only for non Locally controlled Pawns) */
    var()    Controller              Controller;

    /** Point of View */
    var()    TPOV                    POV;

    /** Aspect ratio */
    var()    float                   AspectRatio;

    /** PlayerReplicationInfo (used to follow same player through pawn transitions, etc., when spectating) */
    var()    PlayerReplicationInfo   PRI;
};

Within the structure TViewTarget there is a variable called POV that represents the Point of View. It's of type TPOV which is a structure defined in Object class:
//Extract from Object class...

/**
 * Point Of View type.
 */
struct TPOV
{
    /** Location */
    var() Vector    Location;

    /** Rotation */
    var() Rotator    Rotation;

    /** FOV angle */
    var() float        FOV;

    structdefaultproperties
    {
        FOV=90.f
    }
};

Regarding the existing code in the UpdateViewTarget() function of the SPG_Camera class, the conditional test below was copied from the UpdateViewTarget() function of the Camera class and is used only to prevent the ViewTarget from being changed during an interpolation.
if (PendingViewTarget.Target != None && OutVT == ViewTarget && BlendParams.bLockOutgoing)

The camera setup is done in the two lines of code below, which defines the position of the Point of View as the player's position added with the existing Vector in the SPG_CameraProperties class. After that, it is defined the rotation needed to point the camera toward the player.
OutVT.POV.Location = OutVT.Target.Location + CameraProperties.CameraOffset;
OutVT.POV.Rotation = Rotator(OutVT.Target.Location - OutVT.POV.Location);

Friday, May 25, 2012

Platformer Kit: SPG_HUD class (UnrealScript)

We have seen several concepts related to programming with UnrealScript. Now it's time to see all these concepts together and applied in a game.

In UDN (Unreal Developer Network) there is an excellent game example to study UnrealScript which is the Platformer Starter Kit, available at:

This page at UDN has all the necessary guidelines to configure and run the Kit in UDK.

The UnrealScript source code of the Platformer Starter Kit is very well commented. Even so, some parts of the code is very complex for Beginners in UnrealScript. I'll start a series of articles analyzing the existing UnrealScript classes in the Platformer Starter Kit with the goal of generating an additional material to help in understanding the logic of this example of a functional game.

Let's start by looking at the simplest class: SPG_HUD. The only goal of this class is to draw on the bottom left of the screen the text "Health" with the numeric value that represents the current health of the player as in the image below.


If you do not know anything about the HUD class, I recommend reading my article "Drawing the HUD".

The SPG_HUD class has only the PostRender() function containing the following code.
event PostRender()
{
    local float XL, YL;
    local String Text;

    Super.PostRender();

    // Ensure that PlayerOwner and PlayerOwner.Pawn are valid
    if (PlayerOwner != None && PlayerOwner.Pawn != None)
    {
        // Set the text to say Health: and the numerical value of the player pawn's health
        Text = "Health: " $ PlayerOwner.Pawn.Health;
        // Set the font
        Canvas.Font = class'Engine'.static.GetMediumFont();
        // Set the current drawing color
        Canvas.SetDrawColor(255, 255, 255);
        // Get the dimensions of the text in the font assigned
        Canvas.StrLen(Text, XL, YL);
        // Set the current drawing position to the be at the bottom left position with a padding of 4 pixels
        Canvas.SetPos(4, Canvas.ClipY - YL - 4);
        // Draw the text onto the screen
        Canvas.DrawText(Text);
    }
}

The comments below are related to existing concepts in the above code.

There are two main functions in the HUD class used to draw on the screen, which are "DrawHud()" and "PostRender()". The "DrawHud()" is only called if the variable bShowHud is equal to true and if the Score Table is not visible (bShowScores equal to false). To understand the relationship between the functions "DrawHud()" and "PostRender()", analyze the function "PostRender()" of the HUD class (Engine package).

The PlayerOwner variable is declared in the HUD class and represents the PlayerController responsible for the HUD. Its initialization is done in the function "PostBeginPlay()" of the HUD class.

The concatenation of strings can be done using two operators: $ and @. The only difference between them is that the @ operator puts a space between the strings. Numerical values ​​used in the concatenation are automatically converted to strings. Another way to concatenate strings is using the operators $= and @= that appends a string to an existing string variable. For example, to complement the text of the HUD with the information HealthMax, we can do so:
Text = "Health: " $ PlayerOwner.Pawn.Health;
Text @= "- HealthMax:" @ PlayerOwner.Pawn.HealthMax;

The font used to write the text is obtained from a static function in the Engine class. There are four pre-defined sizes of fonts that are obtained through the functions:
native static final function Font GetTinyFont();
native static final function Font GetSmallFont();
native static final function Font GetMediumFont();
native static final function Font GetLargeFont();

The definition of the font color is done by the SetDrawColor() function of the Canvas class. The color is represented in RGB format, where each parameter is one byte (0-255). It can also be defined the Alpha element of the color that represents its opacity. There is also the SetDrawColorStruct() function which receives a struct of type color. Below are the two functions:
native final function SetDrawColor(byte R, byte G, byte B, optional byte A = 255);

/** Set the draw color using a color struct */
final function SetDrawColorStruct(color C)
{
    SetDrawColor(C.R, C.G, C.B, C.A);
}

Saturday, April 28, 2012

Using Archetypes in UnrealScript

The use of archetypes allows us to store an instance of a class to be modified and used as a template to create other instances of that class in the level editor. This feature is very handy for Designers who want to modify Actors in the level without relying entirely on the programmer.

Create an Archetype is simple, just select an Actor of the level, right-click and choose "Create Archetype ...", as seen in the image below:


Another way to create an archetype is through the window "Actor Classes". Select a class and right-click to see the option "Create Archetype...".


After that, a dialog box is displayed where you should enter the name of the new archetype and the package where it will be stored. The "Grouping" is optional.


After creation, the new archetype will be displayed in the "Content Browser". You can change its properties by clicking the right button on the Archetype and choosing "Properties...". To get the full name of the Archetype choose "Copy Full Name to Clipboard" and then paste in the desired place.


I created a class called ArchetypeSpawner to illustrate the use of archetypes in UnrealScript. This class is placeable and has a variable named archetypeReference which is used to refer to an archetype. There is a function that can be called by other classes to create an instance based on the archetype referenced. In this example it was created a 5-second Timer that will call this function once. The great advantage of this example using archetypes is that the variable is displayed in the editor for the Designer, so he can create any Archetype and inform the full name in the variable archetypeReference in the properties window, as seen in the image and code below.

class ArchetypeSpawner extends Actor
      placeable;

var() const archetype Actor archetypeReference;
//The use of the archetype modifier is optional.
      
event simulated PostBeginPlay()
{
    SetTimer(5);    
}

function Timer()
{
    SpawnArchetypeAt( self.Location );
}    

function Actor SpawnArchetypeAt( vector startLocation ) 
{    
    local Actor archetypeSpawned;
    
    archetypeSpawned = Spawn(archetypeReference.Class, , , startLocation, , archetypeReference);
    
    return archetypeSpawned;
}      

defaultproperties
{    
    archetypeReference=UltraHealthPack'ArchetypeExample.HealthPackArchetype'
}

For more information about Archetypes: